Showing posts with label gluten free. Show all posts

Sunday, December 1, 2013

GLC Soup Series ~ Soup 4: Mushroom Bisque

I realize there may be some dissent on this recipe, because often mushrooms are a "love or hate" food. However, with the intensely cold weather recently, I'd been thinking about a mushroom bisque I had a long while ago, and really craving it. So that's why it's soup number four, and the second to last of the series.


Likely to be the most "complicated" of all the soups I make for the series, so far this one was my least favorite. Don't get me wrong, I still liked it, but it was also the one that seemed to need something--fortunately for me, and you if you want to make it, I know what it is.

Having never made mushroom bisque from scratch, I consulted numerous recipes. Many I found were heavy on the use of dairy or used a flour roux, and though I'm sure they would be tasty or work well--neither of those would be good to my digestive system, so I kept searching. Finally, I found one I believed would be the best option and, with a handful of my own tweaks, be really tasty.

The base recipe I used was from the Moosewood Cookbook by Molly Katzen. What appealed to me about the recipe is the use of potatoes to create a creamy, thicker texture--instead of heavy cream, for example (though it does call for a cup of low fat milk to be used at the end). It also uses thyme as the (only) herb/spice, which I find to be the most complementary of herbs to mushrooms. However,  the recipe only called for 1/4 tsp--and I increased it to 1/2, but in the revised recipe below I chose to add more. Also, Katzen didn't specify what kind of mushrooms, so I used a mixture of fresh crimini, fresh white button, and some frozen porcini mushrooms.


Original Ingredient list (adapted from the Moosewood Cookbook):

2lb of mushrooms (I used 1lb crimini, 3/4 lb button, 1/4 lb frozen porcini)
2 medium russet potatoes
1 cup of mushroom broth (for cooking potatoes)
1/2 cup of water (for cooking potatoes)
1 1/2 Tbs butter
3-4 chopped onions (about 2 cups)
1 stalk of celery diced
1-2 tsp salt
1 to 2 cloves of garlic, minced
1/2 tsp thyme
3 Tbsp of wine (I split this between a dry white and a dry red)
2 tsp tamari (or other soy sauce)
Fresh cracked black pepper, to taste
1/2 cup of half and half
chopped chives for garnish

The result of the original recipe was a filling, earthy-flavored soup, which was quite nice. However, I had a couple of friends over for dinner where I served it, and we all agreed it was good, but it needed a little something else. One friend suggested some fresh grated parmesan over the top, which might have given it some more complexity (or saltiness).  What I really think is that it just needed more garlic and thyme and a good 1/2 cup of wine or sherry (which is what MC called for), and nix the water all together and only use mushroom broth (or stock). Also MC called for water to cook the potatoes in--and I imagine if I had it would have really been lacking in flavor. So, this is how I'll make it from now on...

Revised Ingredient list:
2lb of mushrooms chopped (mixture, but porcini should definitely be included)
2 medium russet potatoes
2 cups of mushroom broth (for cooking the potatoes), plus 1 extra cup if needed
1 1/2 Tbs butter
3-4 chopped onions (about 2 cups)
2 stalks of celery, diced
2 tsp salt
3-4 cloves of garlic, minced
1 1/2 tsp thyme
1/2 cup of dry sherry 
2 tsp tamari (or other soy sauce)
Fresh cracked black pepper, to taste
1/2 cup of half and half
chopped chives for garnish

Start by peeling the potatoes and chopping them into one inch squares, then boil the potatoes in the mushroom broth.

While the potatoes are cooking, you can clean and chop your mushrooms.

Melt the butter on medium heat in a heavy bottomed pot (where you'll be making the soup). Once melted and hot add the onions and celery and saute until they start to become translucent, then add the mushrooms. When the mushrooms soften, add the salt, thyme, and garlic. Cook for about 2-3 minutes then add the sherry and tamari.

Now it's time to puree the mushrooms and the potatoes. I used my immersion (hand) blender, which readers know I love, and it worked well for the mushrooms. They were nicely diced without being too mushy (though I admit they look it).


 Do NOT drain the potatoes--using the hand blender puree the potatoes right in the broth. 


Then add the pureed potatoes and half and half into the mushrooms, and mix well (with a spoon). If the soup is too thick, add the additional cup of mushroom broth. 

Serve with chopped chives, a shave or sprinkle of parmesan, and/or scallions. 


As I mentioned earlier, this is the second to last of my soup series recipes. I would love a vote on the last soup to make. Right now I'm considering a lentil soup, a black-eyed pea with bacon soup, or an old fashioned chicken soup. However, if there's another soup you'd love for me to try (because you're looking for a good recipe) let me know. Please vote on your soup of choice in the comments

In the meantime, Buon Appetito!

Sunday, October 20, 2013

GLC Soup Series ~ Soup Two: Caldo Verde

If you've been following this blog at all, you probably know by now that I am a fan of kale. Well... to be more precise, I try to eat a good amount of it since it's a super food, and when it's prepared the right way, it's quite tasty. I find that kale is a perfect green for soups since it's so hearty and even after it's been in the broth a while it still maintains some texture (unlike spinach, for example). So for the second soup in the series, I decided to include one where kale is a major component. 


Caldo Verde is a Portuguese soup (it's literal translation is "green broth"). It's traditionally made with linguiça (a smoked, cured sausage), but finding it around here was not so easy, so I substituted it with smoked kielbasa made at one of my favorite places in all of Schenectady, Garofalo's. If you're from around the capital region, and don't know this place, I highly suggest a visit (if you're a fan of Italian food or fresh meats, anyway). They've been in business for ages and their products and service are the reason why. After speaking with one of the sisters (an owner), she suggested I use chorizo or the andouille as a linguiça subsitute--which I agreed might be more appropriate replacement sausages--but after I explained that I can only handle so much "heat" from spice, she agreed that the smoked kielbasa was my best bet. 

So here we go, with Gigi's version of....

Caldo Verde


Ingredients:
  • 2-3 TB olive oil 
  • 1/2 to 3/4 lb linguiça or chorizo or andouille or smoked kielbasa, cut into 1/2 inch pieces (that's at least a lb pictured above, I didn't use the whole thing)
  • 1 medium yellow onion, sliced or chopped
  • 2-3 cloves of garlic, crushed or minced
  • 3-5 (about 1 lb) russet or red potatoes, peeled and cut into 1 inch cubes
  • 6-8 cups of water
  • 1 tsp salt
  • 1 lb kale, washed with stems removed and cut into small, bite-sized pieces
Before I go into the steps, please keep in mind that getting good quality sausage is key. You can use one of the supermarket brands for your sausage, but chances are you will end up with a greasy layer of fat on top of your soup, which isn't particularly appetizing. So, I want to make sure it is understood before you make this and decide that it's disgusting--the quality of your ingredients is what can make or break a meal. The majority of sausages I've gotten from Garofalo's are very lean, and there was hardly any fat melting off this keilbasa.

Ok... now on with the cooking.


First heat the olive oil in a heavy-bottomed pot (I use my dutch oven) on medium-high heat for approximately 3 minutes. Then add and brown the sausage. Once the sausage is done, transfer it with the spoon to a bowl or plate.

Add more olive oil to the pan if necessary (and let it get hot), then add the garlic and onions. Sauté them until the onions are translucent and then add the potatoes. Toss the potatoes around the pan a bit, but just so they absorb some of the garlic and onion flavoring, not so they get brown. Then add the water and salt, and cook the potatoes until very tender--about 15 minutes.  

Once the potatoes have softened, mash a couple of them within the soup with the spoon or a fork--this adds a little creaminess to the texture of the soup. Then add the kale and let the soup simmer for about 5-7 minutes. 

Once the kale wilts into the soup and appears to be cooked through, add the sausage and stir. Let the soup simmer with all the ingredients for about five minutes or so to make sure the sausage is heated though and the flavors come together nicely. Then it's ready to eat!

For a soup that is so simple, and has so few ingredients, the flavors and textures can't be beat. The smokey and spicy flavor of the sausage complements the bitter greens, while the potatoes add a rich comforting starch with an almost creamy texture. If desired, you could sprinkle a little grated parm on top of this soup, but I don't think it's necessary. And though dipping a nice piece of bread or some crackers might be your normal accoutrements for soup, I don't think this one requires any additions.


You can store leftovers in your refrigerator for up to a week, or freeze it for longer, but I doubt it'll last that long...  I have to admit, over the course of five days, I made it through this entire batch (about 2 quarts). No taste-testers or even frozen leftovers, this soup was all mine. I had it for lunch or dinner each day, and it was gone before I knew it! 


Sunday, October 13, 2013

GLC Soup Series ~ Soup One: Carrot Ginger

"Soup! We've got all kinds of soup!"

This was/is a common thing my mom would cheerfully and encouragingly say to me and my siblings when we were looking for a quick dinner. Growing up, my parents' house was (and is, still) full of a variety of canned soups. Rarely, though, did any of them appeal to us. Don't get me wrong, if my mom made soup for dinner (from a can or otherwise), we'd eat it, it just wasn't always the most appetizing food--especially because her homemade food was/is always so much better.

Anyway, this series is not going to be about soup in a can. It's going to be about soups made from scratch. And though they take some effort, they won't be so labor intensive that you'd probably prefer opening a can of Campbell's (and I admit, I still love their high fructose and sodium laden tomato soup on occasion--especially with grilled cheese).

****
The first soup of this series is a carrot ginger soup. Carrots and ginger pair pretty well together, and carrot ginger soup is relatively common. However, it wasn't until about seven years ago on a chilly early spring night, that I had one I loved. It was at a small and pricey French restaurant, so soup was one of the few things I was comfortable ordering there--and I'm glad I did.  Following that night, I searched for recipes and began experimenting with the ones I found until I finally made a carrot ginger soup that I think is just as good as the one from that French restaurant. If you decide to, you can just use vegetable stock (no chicken stock) to make it vegetarian, just don't omit the butter to make it vegan, I can't make any promises about this recipe if you do....

Gigi's Carrot Ginger Soup


Ingredients (Makes About 2 Quarts):
4 Tb unsalted butter
1 lg yellow onion, chopped
2 Tb minced or finely chopped fresh ginger
3 cloves crushed or minced garlic
4 cups of chicken stock
3 cups vegetable stock or broth
1 cup dry white wine
1 1/2 lbs carrots, peeled and chopped into 1/2 in. pieces
Salt and pepper to taste

Optional ingredients for serving:
Fresh lemon juice
Snipped chives or parsley
Olive oil
Sour Cream

Begin by melting the butter on medium heat in a large heavy-bottomed stock pot. Add chopped onions, garlic, and ginger, and saute for 15-20 minutes or until aromatic and onion is translucent. Try not to let the mixture brown as it will create a bitter flavor.

Add white wine and let it cook down a bit to burn off most of the alcohol (3-5 minutes), then add the stock, broth, and carrots. Heat until boiling, then reduce the heat and let simmer uncovered until carrots are tender (about 35-45 minutes).

Once carrots are tender (can be easily crushed with a fork or spoon), turn off the heat. Using either a hand (immersion) blender or a food processor, puree the soup until smooth.  Note: If you are using a food processor, be certain to let the soup cool a bit, puree it in small stages, and leave the shoot open, otherwise you may have a very hot explosion (and subsequent burns and a mess) on your hands... or face or entire kitchen. I used a hand (immersion) blender, which works best and allows you to pretty much serve the soup immediately. I love my immersion blender... someday I'll probably write a post just about that.


Anyway, once the soup is well pureed, you can season with a tablespoon or so of lemon juice (in the whole pot), and serve it with a sprinkle of chives (as I did), parsley, sour cream, or a dash of good olive oil--and any combination you please. I actually really like it with a small dollop of sour cream and than a dash of chive oil on top.

The soup is rich and filling without being very heavy. It is the kind of soup that can work well served as the star of a meal, particularly if it's served with  a good piece of crusty (sourdough, maybe) bread, or even a salad made with mesclun greens, apples or pears, and blue cheese.

My usual taste-tester, Andrea, had a cup of it after I made it and she said, "I think this is the best carrot ginger soup I've ever had." Granted, she seems to like most of what I cook, but I agree with her. :)

Bon Appétit! 

Short cuts: though I recommend fresh ginger, you can use the pre-crushed stuff that comes in a jar (not the dried, masticated stuff) to make this soup just be sure to use an extra tablespoon or so, and to make the prep a little quicker, you can always used some baby cut carrots (chopped in half length-wise) since they're already peeled and washed. 

Sunday, October 6, 2013

Put a Stock in It!

I love this time of year. It's my favorite kind of weather and the changing, colorful leaves makes everything seem so cheerful to me. The other day while on a bike ride, it felt somewhat magical when the wind picked up and I rode through a parade of little yellow leaves falling from the trees--even though my nose was running and I was looking forward to getting a warm beverage once I was finished. Of course, typically autumn means cool, often rainy, days become the norm and we seek comfort from the chill that sometimes gets into our bones through hot, flavorful foods. Many of those foods, particularly the soups we tend to make this time of year, include the use of stocks (chicken, veggie, etc.). You can buy stock at the grocery store, of course, but why not make it yourself, particularly if you have the ingredients on hand and they may otherwise not get used.

For example, ever buy a rotisserie chicken or bake a whole chicken at home? What do you do with the leftover bones/carcass? I know, "carcass" isn't the most appetizing word, but if you can get past it, I highly suggest taking what's left of the bird (especially if there's some meat left on it), and making a stock with it. I did just that recently.


I used my slow cooker, so making this stock was unbelievably easy. If you have one I would suggest using it as well, because other than maybe stirring it occasionally, you can just let the stock simmer all day and not worry about keeping an eye on it. However, it's just as easy to make on the stove as well.


Gina's Chicken Stock 


Ingredients:
1 medium-sized leftover chicken carcass from a rotisserie (baked works fine, too)
3-4 carrots (washed, but no need to peel them)
3-4 celery ribs (again just washed, no need to trim)
1-2 onions, skin peeled and cut in half
1-2 bay leaves (if small, use two)
3-4 whole cloves garlic (peeled)
1 tsp whole peppercorns
1-2 tsp of sea salt (or more to taste, but be careful not to over salt)
1/2-1 cup fresh parsley (washed, but again... no need to chop)
2 -3 quarts of water

Another item needed: a good mesh strainer

Now, this may be hard to believe, but all you need to do, is put everything in the pot (slow cooker or large stove top pot) and cover it with water then set it on low heat, put the cover on, and leave it for the next 6-10 hours. You want the stock to simmer* for the entire time, so you can stop to stir it occasionally, but other than that, you can just leave it alone until you're ready for the only (not really) challenging part of making the stock: straining it and storage.

After about three hours my house was beginning to smell of chicken soup (the good homemade kind, not the ring o' noodle kind). And this is what the stock looked like:


I let it cook for another four hours, though. I wanted to get the most out of my stock, and the longer it simmers the more the flavor develops. But after seven hours, I was ready to use some of the stock, so it was time for straining it.

Now, if I didn't have a slight tendency to be klutzy, I probably could have picked up the ceramic insert from my slow cooker and poured the whole thing into the large bowl over the strainer, but I didn't want to chance having the stock go everywhere--so I chose the safe and easy way to strain it, even if it was a bit more time consuming.

Using a pair of tongs, I removed all the large items from the stock and placed them in the strainer over the bowl. (I wanted to make sure to get as much liquid as I could out of this stock, so I didn't want to toss the large pieces of chicken and veggies).

Once all the larger items were removed and sufficiently strained of all liquid, I tossed the items away. Then I started pouring the liquid through the strainer using a large ladle. Because chickens have some tiny bones and using a slow cooker makes everything fall apart, I actually strained the stock twice to make sure I didn't end up with any "debris" in my stock. But after I was done, I ended up with just over two quarts of richly flavored stock. I froze a little more than half of it and put the rest in the refrigerator to use throughout the week.


So simple and easy, and it's a great way to save or get the most out of your money. I'll without a doubt be doing this again.

*If you have it on the stove make sure it doesn't start to come to a boil, otherwise you could end up with a bit of mess and a lot of liquid loss, which you want to avoid so the stock retains all the intense flavors (that's the point of a stock after all). 

Friday, September 13, 2013

Leftover Polenta? Try these!

Polenta Croutons

So, admittedly this recipe makes a lot of polenta and if you don't have a large family (or appetite) it can leave a good amount of leftovers.

I find that I usually prefer polenta the day I make it, even though there are a lot of recipes that suggest you spread the creamy or even "mushy" stuff into a pan, let it cool (in a refrigerator or on the counter) to harden a bit, and then slice squares or pieces of it to serve. Strangely,  I kind of like the semi-soft mush so that's usually how I eat it. However, a long while ago I was at an Italian-American restaurant that used polenta (i.e., gluten free) croutons in one of their salads and they were fantastic. Normally, I don't care for croutons--at least ones from a bag, etc. They're too crunchy and salty and they just don't work on a salad for me. The polenta ones, however, had the perfect tooth bite and didn't threaten to cut up the roof of my mouth.

So, anyway, I set out to use my leftovers to mimic those famous polenta croutons. And, not to toot my own horn (well, maybe a little), they were pretty damn good.

Ingredients:
Polenta spread into a pan and refrigerated overnight (or for several hours)
1 Tb butter
1 tsp garlic powder
1/2 tsp sea salt
Olive oil, if needed


This is what I did:

I spread the leftover polenta into a cake pan so that it was maybe 1/2 inch high, then I refrigerated it overnight.

The next day, I cut it into "crouton-sized" squares. In a medium frying pan, I added the butter and garlic powder and turned the flame to about medium heat.

Once the butter was melted and a little frothy, I added the polenta. Then it was a patience game because in order to make sure the squares get crispy, I needed each side (or almost each side) to brown a little. I would say I gave it about 7 minutes per side on medium to low heat.


You really just need to keep your eye on them and try not to let the butter brown much. If you find the polenta sticking at all, add a couple drops of olive oil (you can also add more butter, if you prefer).

Once they were lightly browned and crisp on the outside, I gave one a try on its own. Buttery and garlicky crispiness on the outside and a creamy polenta center... it was pretty heavenly--and I think I managed to replicate the ones I had at that restaurant... mine might even have been better. 

This is how I served them:

I think it was one of the best salads I've ever made (mesclun greens, herbs, roasted red peppers, cucumbers, and some fresh mozz with a balsamic vinaigrette--and of course the croutons).
  

Friday, September 6, 2013

Simple, but Good: Polenta with Beans and Greens


With the beginning of fall-like temperatures, I found myself craving a, typically, cool-temperature food: polenta. Polenta can be a little polarizing—most people seem to either like it or hate it. For me, however, it’s one of those foods that needs to be cooked the right way and served at the right time, otherwise I’m usually not that interested. For example, a couple of years ago I was in Rome with my aunt. It was a cool, rainy February afternoon and we ducked into a little ristorante for some lunch. She ordered what may be the best polenta I’ve ever tasted.  I don’t know if it was coming in from the cold, wet cobbled streets or how it was made (a simple yellow polenta with four kinds of cheese), but it was incredible.  Whatever the reason, I believe it’s important to never under estimate the weather and the timing when it comes to a meal—if you’re truly hungry and the food fits your mood it could be the best meal of your life—even if it’s just soup and a sandwich (or polenta and cheese).

…Getting back to the polenta. I’m still not sure if I’ve mastered how to make the best polenta, but I think this recipe may have turned out the best so far. I made it in the crockpot and cooked some greens and beans to go along with it.

Polenta ingredients:

3 cups of hot chicken broth (can use vegetable broth or just more hot water)
4 cups of boiling water
2 cups yellow cornmeal (usually labeled as polenta)
1 Tb butter
Anyone else see Starry Night?
1 Tb olive oil
½ cup (or more) shredded parmesan cheese
½ teaspoon salt (or more if butter is unsalted and/or using no broth)


This is beyond easy—ready for the directions? Heat the liquids to boiling (or almost boiling), pour the hot liquid into the crock pot, add olive oil, butter, and salt, then stir in polenta. Cook polenta on high for 1 hour (stirring occasionally), then add cheese, and continue cooking for 1 more hour on high—stirring occasionally—or until all liquid is fully absorb and wooden spoon stands up in polenta on its own.


Greens and Beans ingredients:


2 TB (more or less) of olive oil
1 medium yellow onion chopped
7-10 cloves of garlic, roughly chopped
½ cup chicken broth (or stock)
1-2 lbs cooking greens (I opted for ease and used Olivia’s cooking greens)
1 15oz can white beans, rinsed well (or use your own soaked and cooked, again I opted for ease…)
3/4 cup of diced tomatoes (canned or fresh)
Salt and Pepper as desired

Again, pretty straight forward here. In a large frying pan or dutch oven, start by sautéing the garlic and onions (medium flame) in the olive oil until they’re just translucent. Then add the beans. Let them heat up
and marinate in the pan with the garlic and onions. Add the tomatoes and stir those around until warmed through. Next add the chicken broth and let it reduce a little, then add the greens until they are bright and
wilted. Salt and pepper to taste.

The fresh, slightly bitter, and, honestly, healthy taste of the greens and beans were a great accompaniment to the rich polenta. I admittedly added a little more cheese to my plate when I served it, but it’s not necessary. It may not have been as good as the polenta in Rome, but I’m certain I’ll make it again this fall.

Also, you’ll probably notice that the photo of the B&G ingredients has some jarred artichoke hearts included—I decided against using those. Initially I thought I would add a bunch of other veggies to the greens, but the basic recipe (above) seemed to do the trick—especially since the point was really just to enjoy the rich flavor of the polenta.

In cooking, as in life, sometimes sticking to the simpler things, the basics, is not only enough, but just right.

Saturday, August 10, 2013

Berry Nutty and Crunchy Granola

OK, so the title is corny, but there's no corn in this granola! There is, however, tasty dried berries along with walnuts and sliced almonds.


Making granola is pretty freaking easy—I kind of can't get over how much money I've spent on granola in the past when I figured out what it cost me to make about 6 cups of this compared to the organic stuff I've bought before (and I used all organic ingredients).


Ingredients:

• 3 cups oats (regular, not quick cooking)
• 1 1/2 cups of nuts (as mentioned I used walnuts and sliced almonds, but you can use any combo you like)
• 1/2 cup of cranberry nectar or juice (you can also use apple juice or whatever fruit juice you prefer, just know it will likely add to the flavor of the granola.)
• 1/2 cup of maple syrup (agave and honey work, too)
• 1/4 cup coconut oil (butter or canola oil can work here, too)
• 1/2 TB vanilla extract
• 1/2 TB almond extract (alternatively, you can use 1 TB of one extract instead of both)
• 1/2 tsp fine sea salt
• 2 tsp (scant) ground cinnamon
• 1 1/2 cup dried berries (I used cranberries and blueberries)

After I gathered the ingredients, I began by  preheating the oven to 325°.  I then combined the oats and nuts in a large bowl. Next, to a small/medium saucepan I added the juice, syrup, coconut oil, extracts, salt, and cinnamon and put it over a medium/low flame. I heated the  mixture until the coconut oil was all melted and it seemed hot enough to melt the salt (almost simmering). Once it looked ready, I poured it over the oats and nuts and mixed it so they were will coated.


Once it was evenly coated. I spread the granola mixture out on a cookie sheet I lined with parchment paper.*
Before Baking

Then I baked the granola in the preheated oven for about 40 minutes—stirring every 15 minutes or so. Once I took it out of the oven it was a nice golden brown.
After Baking

I let the granola cool completely (that took about 20 minutes) and poured it into the bowl of an air-tight container where I added the dried berries. Putting the top on and shaking it for about 20 seconds mixed the berries into the granola nicely.

The next morning (and subsequent mornings, since) I had some with the addition of fresh blueberries and almond milk, and I have to say, it's pretty darn good. Just the right sweetness and the lovely toasted flavor of the oats and nuts with the sweet and tart flavor of the berries.


If you make it, keep in mind that the sweetness level may vary if you use a juice or sweetener that tends to be more or less sweet. For example if you use apple juice and agave, it's likely to be on the sweeter side (plus the berry flavor won't be there, but you could, for example, use dried apricots and apples in it instead of berries). And as long as you use gluten free oats, this recipe is gluten free too. :)

*Using parchment is highly recommended since it prevents the granola from sticking to the pan and you can pick up the paper and pour the granola into a container once it's cooled.

Monday, July 29, 2013

Rrrrrapid Hhhhuevos Rrrrancheros!


The other morning I woke up with a hankering for huevos rancheros. And aside from the ranchero sauce,  I had everything else needed.


Here's what I used:

1 can of black beans
1/2 tsp cumin
1/2 tsp chilli powder
1/2 tsp smoked paprika
1/2 tsp dried oregano
Pinch (or two) of sea salt
2 eggs (I scrambled them, but your choice)
1/2 a pat of butter for cooking the eggs
2 small corn tortillas
Sprinkle of cheddar cheese
Salsa Verde
Red Salsa
Fresh cilantro

I began by cooking the beans (after rinsing them well--I always do this for all canned beans, even those canned without salt) with the spices (cumin through salt) on medium for about 10 minutes. While those were cooking, I scrambled the eggs and poured them in a nonstick pan with the butter melted.

Since eggs have a tendency to burn if I walk away from them, I finished cooking them and then moved on to heating up tortillas in a small frying pan. To save a step, I probably could have just zapped the tortillas in the microwave, but I find that they fall apart when I go to eat them any time I use the microwave... maybe it's just me.

Since the eggs were warm I decided to sprinkle some cheddar cheese on them and put the cover back on--letting the cheese melt while I got the tortillas ready. 

I put a large spoonful of the beans on each tortilla and then sprinkled some fresh cilantro on top of those.

Then I split the scrambled eggs up on each tortilla and dressed one with salsa verde (my new favorite is from Trader Joe's) and the other with Green Mountain Gringo salsa. And as you can see from the first photo, I garnished the plate with red grapes and carrots.

I realize this dish was hardly from scratch (and that my attempt at a Spanish sounding title could really use some work), but I think this quick huevos rancheros was quite tasty. Now, I could have gone ahead and made an actual ranchero sauce, and if I did, I'd likely make this one (though, i would substitute the green bell pepper for yellow or red since green bells don't agree with me).  However, in the interest of time, I decide to forgo the real deal and use two different kinds of salsa. For shame? I don't think so. I love both of those salsas and I'm willing to bet I still put more steps in the process of making theses than a certain food network star who thinks adding fresh cilantro to jarred sauce makes it "semi-homemade." Just saying...


Saturday, June 8, 2013

Meatless (and Mexican) Mondays

I am a meat eater, but I mostly eat vegetarian--mainly because it's cheaper and tends to be easier to do so as a cook (i.e., it's a lot easier to mess up a piece of meat than a pot of pasta). Nowadays though, I try to make it a point to be meat free on Mondays--mainly for health reasons, but also for budget purposes. So I've been experimenting with more exciting vegetarian meals, and though I'm not a fan of green bell peppers (and they don't like me, either), I've always found that when a poblano is cooked, the flavor is mild and tasty. So last week I picked up some poblanos, which I decided to grill and stuff with beans, rice and corn.


Grilled and Stuffed Poblano Peppers

Ingredients
4 Poblano peppers
3/4 cup cooked brown rice
1/2 cup of black beans (I used refried)
1/4 cup of sweet corn kernels (canned or frozen)
1/2 cup chopped cilantro
1 teaspoon cumin
1 teaspoon chili powder
1/2 teaspoon Mexican oregano
1/2 teaspoon garlic powder
1/4 cup shredded sharp cheddar cheese
a few grape tomatoes sliced (for garnish)
Oil for grill pan

Serves 4

I cut each of the poblano peppers in half (lengthwise), removed the seeds and washed them. Then I popped them onto a lightly oil grill pan. I left them on the pan (on a medium flame) until they had some nice grill marks and were softened.


In the meantime I made the "stuffing" by combining the rice, corn, beans and all the seasonings (chopped cilantro through garlic powder) so that everything seemed well mixed.


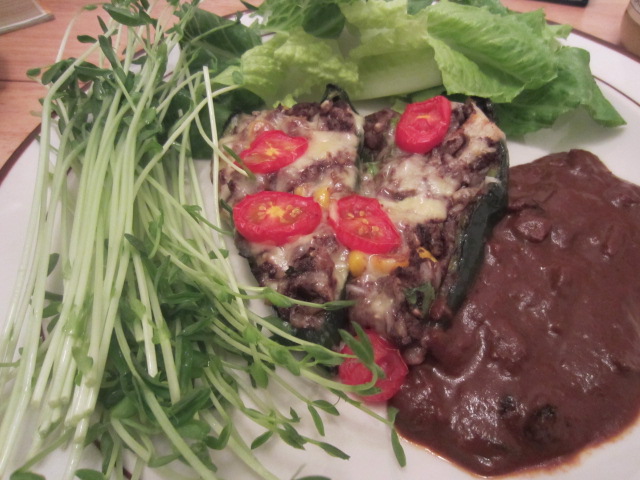
Once the peppers were ready, I let them cool for a few minutes and then stuffed each with about a half cup of the filling and placed them in a roasting pan. Then I sprinkled the cheese on top of each and garnished with slices of grape tomatoes.


I popped the peppers in the oven for approximately 35 minutes on 350° just so the peppers would be nicely warmed through and until the cheese was melted well (see top photo).

I decided to use a jarred mole sauce to top the peppers, but the sauce itself, which isn't bad, seemed like it needed something extra, so I doctored it up with some  raisins and smoked paprika. Any tasty Mexican sauce (salsa verde, enchilada sauce, etc.) would probably go well with these, but I did enjoy the rich flavor of the mole.


I served the peppers with chopped romaine lettuce and pea shoots and the mole sauce, and it was a lovely meal. I definitely think I'll add this into my rotation. I've even considered adding chopped spinach to the stuffing, just for a little more greens.